Physical Address
304 North Cardinal St.
Dorchester Center, MA 02124
Physical Address
304 North Cardinal St.
Dorchester Center, MA 02124

Upgrading your RV door might seem daunting, but these step-by-step instructions will save you hundreds in professional fees.
If you’re facing a damaged or outdated RV door, you don’t need to live with it or pay hefty service fees for replacement. With basic DIY skills and the right tools, you can tackle this project yourself in about half a day. While replacing an RV door might seem intimidating at first, breaking it down into manageable steps makes the task much more approachable. Let’s walk through the process to help you save money and upgrade your RV’s security and comfort.
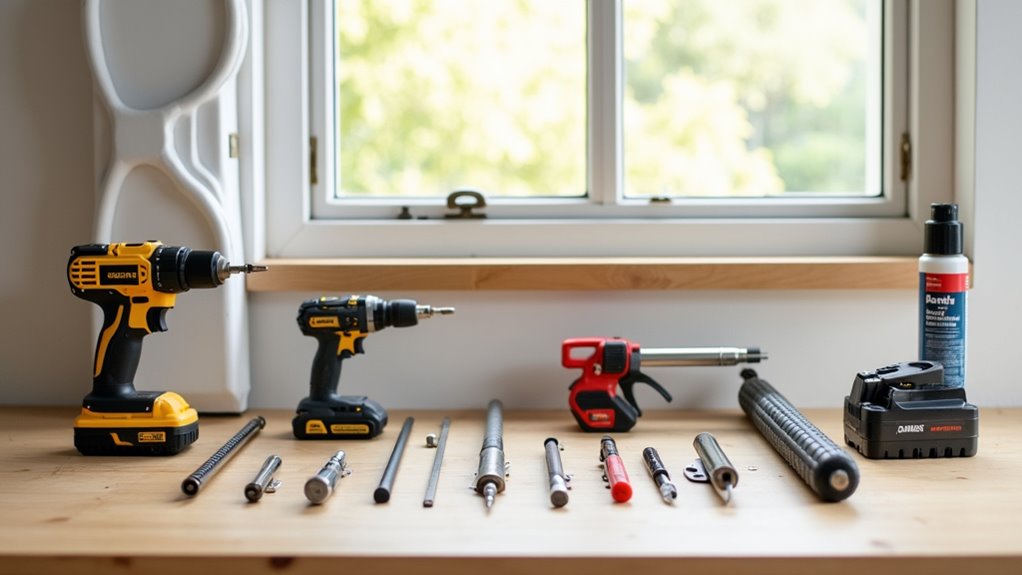
A successful RV door replacement begins with gathering the right tools and materials.
You’ll need both flathead and Phillips screwdrivers, a drill, rubber mallet, pliers, and a utility knife. Don’t forget essential safety gear like protective gloves and safety glasses to prevent injuries during installation.
Proper tools and safety equipment are essential – gather screwdrivers, drills, mallets, and protective gear before starting your RV door installation.
For materials, start with your replacement door, confirming it’s compatible with your RV’s frame. Consider options like the Keyless RV Door Lock for enhanced security and convenience during the replacement process.
You’ll also need appropriate screws that match your door frame’s material, PVC foam tape, and RV-specific exterior sealant. Include a trim sweep to protect against water infiltration at the door’s bottom.
Before starting, gather measuring tools like a level and tape measure to verify proper alignment.
These tools will help you achieve a precise fit and prevent costly mistakes during installation.
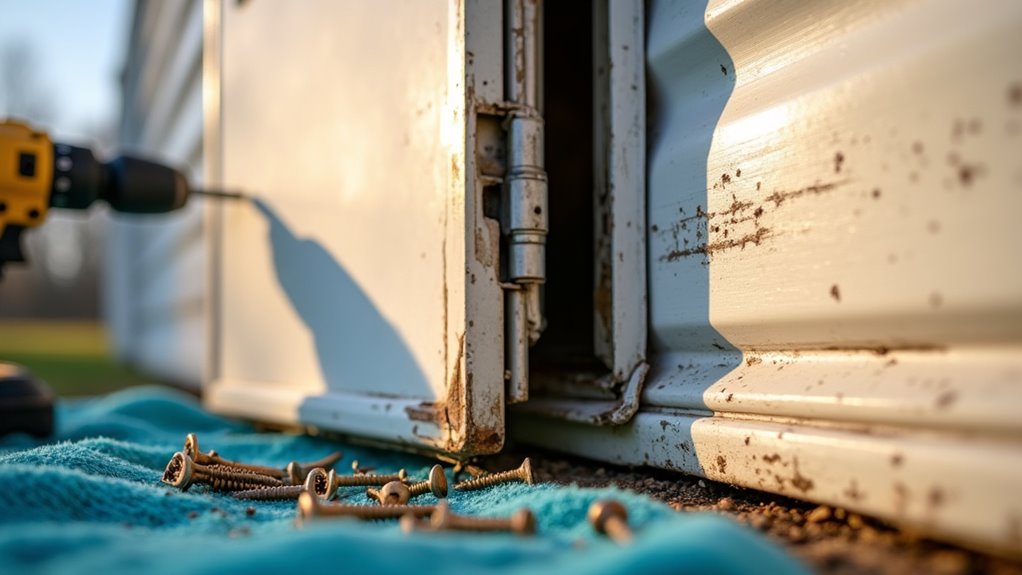
While removing an RV door might seem challenging, breaking down the process into manageable steps makes it straightforward.
Start by removing the drip cap‘s retaining screws and carefully breaking its silicone seal with a razor blade. Use a non-marring trim tool to pry off the drip cap and remove any snap trim along the door frame.
Next, remove all screws securing the door and break the caulk seal using a thin metal putty knife with rounded corners.
You’ll need a helper for the actual door removal. Once all seals are broken, carefully lift the door out and place it on a soft surface. Always follow proper lifting techniques to prevent back strain or injury.
Remove all hardware, keeping components organized for future use. Clean the frame thoroughly, removing any residual sealant or adhesive.
Don’t forget to check for and remove any shipping or alignment blocks before preparing for the new installation.

Proper door frame preparation serves as the foundation for a successful RV door replacement.
Begin by checking that your frame’s exterior surface is flat within 1/8 inch. Scrape away any old adhesive, tape, or sealant using a scraper or solvent. Inspect thoroughly for rot or water damage that’ll need repair before proceeding. Always maintain the door locked position during preparation to ensure proper alignment.
Measure your door opening carefully, comparing diagonal measurements to verify they’re within 1/4 inch of each other. The rough opening should match your door’s specifications exactly. Check that the sill sits square to the floor within 1/8 inch.
Clean the frame thoroughly, then apply new PVC foam tape or sealant around the perimeter.
Keep your tools and hardware ready: you’ll need a drill, screwdriver, measuring tape, and appropriate fasteners for your specific door model.

Lift your new RV door carefully into the rough opening, making sure it sits flush against the frame. Center and level the door, using tape temporarily to hold it in position. Check that the bottom seals properly along the threshold and keep the deadbolt retracted during placement.
Install the first screws at the top and bottom corners, then work your way through the hinge points and lock side. Having an extra helper will make positioning and securing the door much easier. Drive screws perpendicular to the unit, keeping them snug but not overtightened. Remove positioning tape once the door is secure.
Add screw covers to the frame channel and attach the drip cap above. Install the trim sweep behind the threshold for better sealing.
Test the door’s operation by opening and closing it several times, verifying even gaps and smooth latching.

Getting your RV door properly sealed and weatherproofed is essential for comfort and protection. Start by removing old seals completely, using adhesive cleaners and scrapers to create a clean surface. Use alcohol wipes after scraping to ensure the area is completely clean and free of oils.
Measure your door frame carefully and choose appropriate sealing materials – you can use RV-specific weatherstripping or save money with standard pipe insulation foam.
RV owners can opt for dedicated weatherstripping or more affordable pipe insulation foam – just ensure precise measurements before purchasing.
Before installing new seals, test-fit them to guarantee proper alignment. Apply the seals gradually in sections, peeling the backing and pressing firmly into place.
Don’t remove and reapply seals, as this weakens the adhesive. Leave extra material at the bottom for trimming later.
Once installed, your new seals will regulate temperature, prevent water intrusion, keep pests out, and reduce drafts. Well-installed seals provide lasting protection against various weather conditions.

With your seals in place, it’s time to verify your RV door functions correctly through a series of tests and adjustments.
Start by checking the door’s alignment with the frame and testing its swing for smooth operation. Make certain the latch engages securely and the hinges are tight without signs of wear. Using a Dewalt screwdriver gun, carefully test and tighten all mounting screws.
Level the door to prevent uneven stress, and double-check all electrical connections if your door has integrated features like sensors or step mechanisms.
Test the emergency exit functionality and verify that safety features work properly. Don’t forget to inspect the door’s finish, handle, and trim for any damage.
Document your installation process and keep warranty information handy.
Apply the “Inspected Latch” sticker if required, and confirm you’ve followed all manufacturer guidelines throughout the testing process.
You’re almost done with your RV door replacement – but don’t relax just yet. Test the door’s operation multiple times, checking for smooth opening and closing. If you notice any gaps or alignment issues, adjust the hinges and striker plate now. Once you’re satisfied with the fit, apply a final bead of sealant around the frame. Your DIY effort will save hundreds in service costs.